
Over the years, Shopify has steadily made it easier to customize your online store’s look and feel to fit your brand.
At 2021’s Shopify Unite, they announced their “biggest update ever” with the introduction of Online Store 2.0.
This welcome update encompassed functionality and design overhauls that made their theme editor so much more powerful for editing your Shopify page templates.
A big part of this was a ton of new themes that allowed for adding and customizing sections and blocks on every page template instead of just the homepage.
Sections are essential tools for customizing your store, so we thought we should devote a whole blog post to this fantastic Shopify store-building component. Plus, what Page Builder is doing to make this feature even better?
In this post, we’ll cover:
- What Shopify sections are
- How to use sections in Shopify
- How to add new sections on Shopify
- How to create custom sections with Page Builder
What are Shopify sections?
Sections are customizable components within Shopify page templates that can be reordered, added, and removed to create desired layouts.
Originally introduced in 2016, sections were a significant step forward for Shopify merchants’ ability to make code-free changes to their themes.
Within the theme editor, each section on a page template could be customized to the extent allowed by the theme. So, you could quickly update headings, text, colors, images, buttons, etc and it would show a real-time preview of the changes.
Sections include sub-components called blocks that can be moved within a section to alter the layout of the section itself.
From the introduction of sections, all page templates on new themes allowed for section customization but not for reordering sections to change the layout.
The homepage was the only page template that allowed for this drag-and-drop functionality in the theme editor.
For all other page templates, layout changes had to be made via the code editor with edits to the Liquid files.
That was until Online Store 2.0 and Sections Everywhere.
What are Sections Everywhere?
With Shopify’s Online Store 2.0 updates, new themes allowed users to add, reorder, delete, and customize dynamic sections on every page template type in the theme editor.
No longer was this super helpful functionality limited to the homepage. This has been referred to as Sections Everywhere in the larger Shopify ecosystem.
The introduction of JSON template files with Online Store 2.0 opened up the ability to add, remove, and reorder sections on page templates.
These replaced Liquid templates that were previously used. Liquid is still the language used for the sections referenced in the JSON template files.
Beyond that, the update made it possible for developers to include custom sections in the theme editor.
This opened up the exciting opportunity for Shogun Page Builder users to create their own custom sections—totally code-free—and use them directly in the Shopify theme editor.
Online Store 2.0 themes vs vintage Shopify themes
The most apparent change from Shopify Unite was the new themes that now dominate the Shopify Theme Store.
There are now 83 OS 2.0-enabled Shopify themes on the Shopify Theme Store.
While previously all new stores started with the Debut theme pre-loaded, now newly built stores default with the OS 2.0 enabled Dawn theme.
Anyone still using Debut or any other vintage Shopify themes cannot access the improved ‘sections on every page’ functionality. Those themes continue to be updated but will not get these new features.
This is because the vintage themes have an altogether different theme architecture than the new themes, which limits the essential functionality they can add.
Shopify theme architecture: Vintage vs Online Store 2.0
You can really see the difference between the old and new theme architectures when you dig into the code editor.
Vintage theme architecture
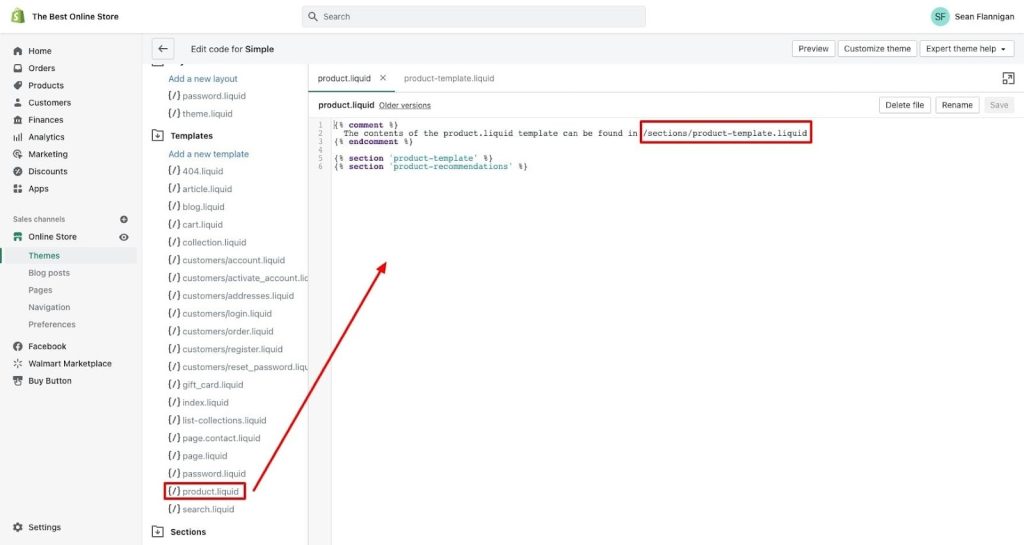
First, let’s look at the code editor for the vintage theme Simple.
You can see that the files in the Templates folder are all Liquid files.
The theme template for the product page has very little going on, with a comment letting you know that the content of this page is located in the section file product-template.liquid.
That is followed by two references to section files—product-template and product-recommendations.
Going into the product-template section file, you find all the code that defines the content shown on the product page, with a predetermined layout for all product information (what you see as blocks in the new themes).
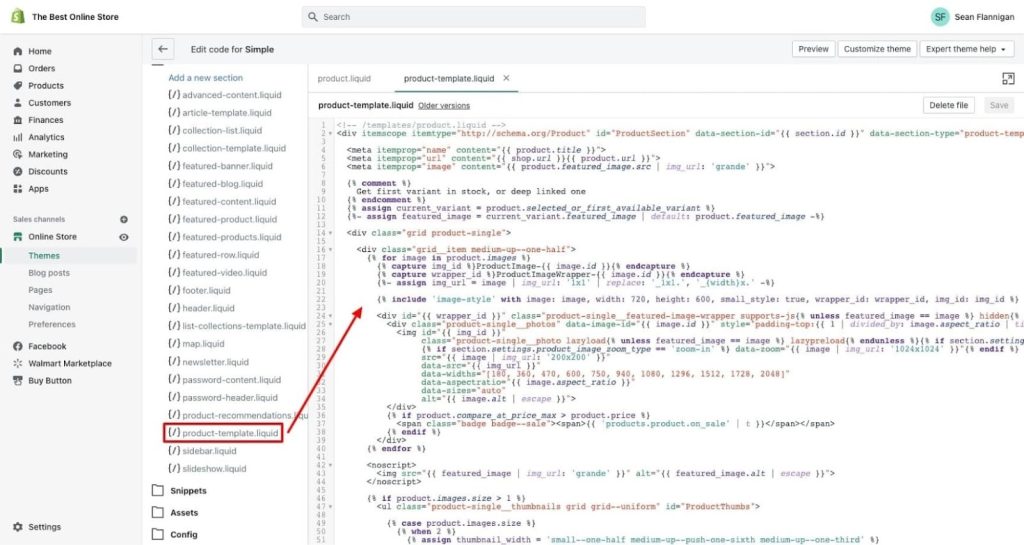
All the logic for how product pages work for this Simple theme is determined by this section file.
Online Store 2.0 theme architecture
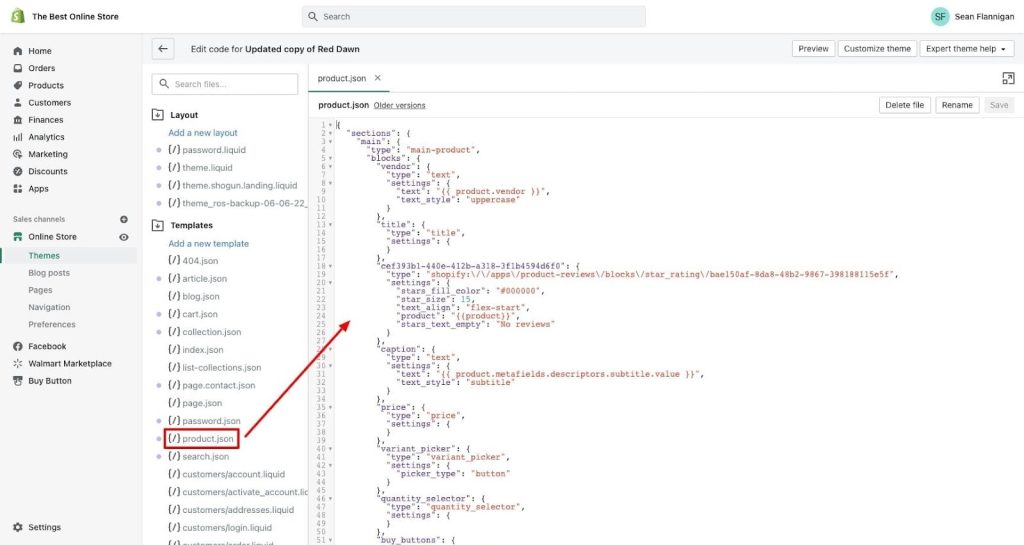
Moving on to the latest version of my Online Store 2.0 enabled Dawn theme, you can see that the template files are almost entirely JSON files.
To compare apples to apples here, let’s look at the product template on this OS 2.0 theme.
The code is simple, building the page layout by referencing the section files it should render in a particular order.
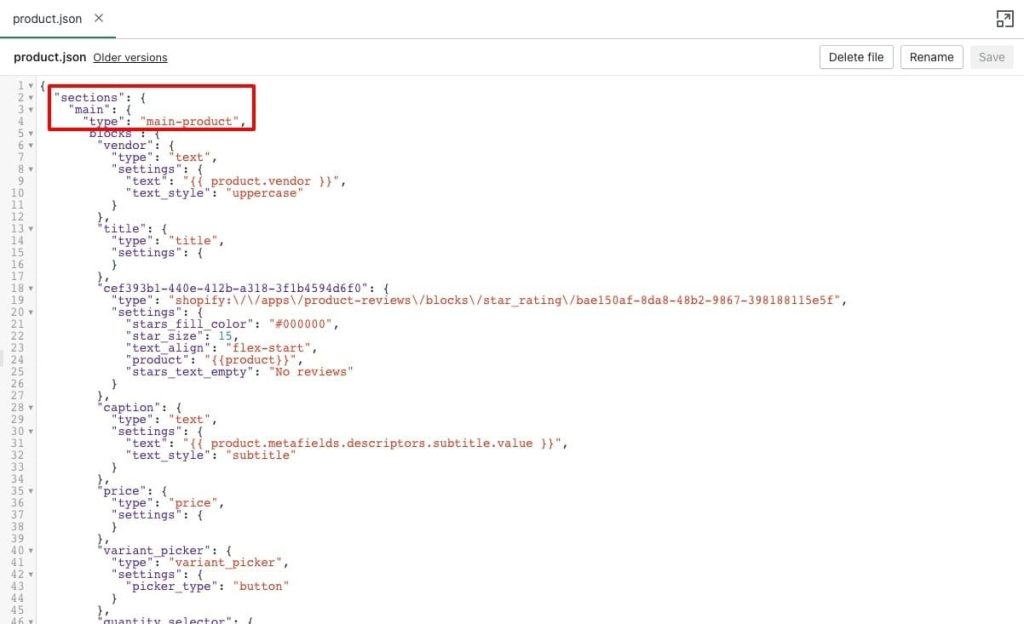
Looking closer, you’ll see it begins with the main product file from the Sections folder.
What follows is a series of subcomponents called blocks, which can be reordered similarly to the sections.
When you go to the Sections folder, you’ll find the Liquid files that the JSON templates use to create the individual page templates.
Here is the main-product.liquid file that the product.json file calls up first in the product page template. It brings together the CSS style assets for its individual components with logic for how those components will display for visitors.
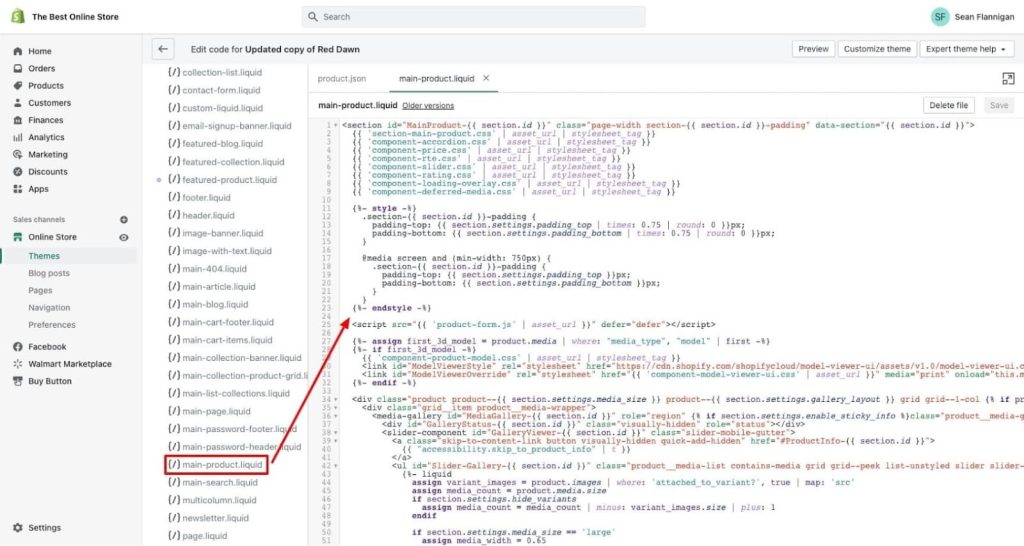
The JSON template is what unlocks the ability to reorder, add, and remove sections on every page template in the theme editor.
As changes are made to the page templates in the theme editor, the JSON file is updated to match.
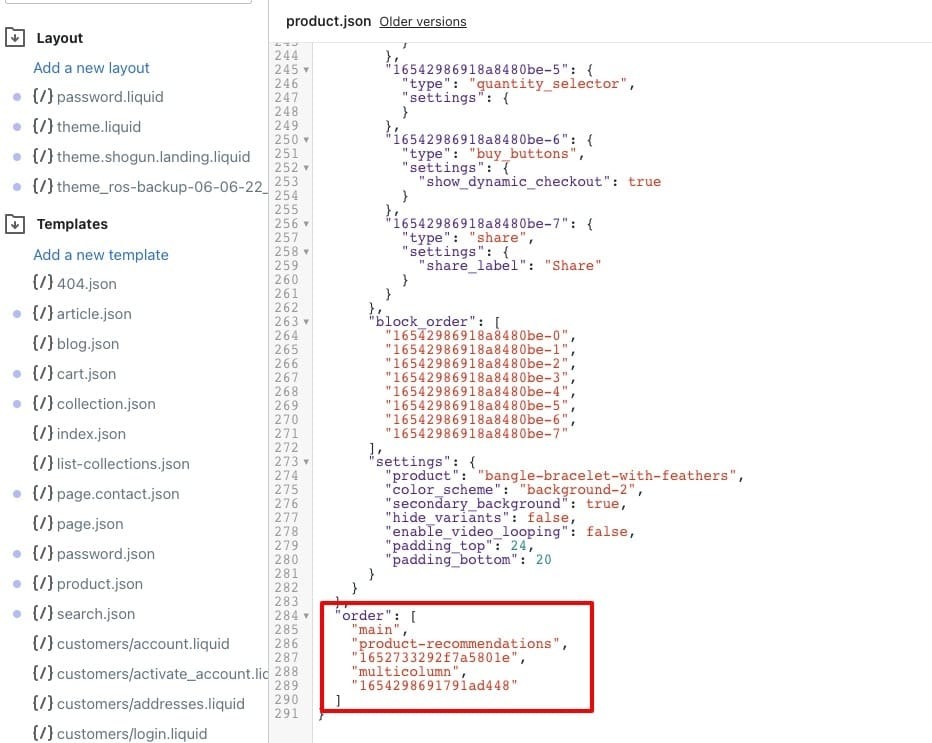
At the bottom of each JSON template is an array schema called “order,” which lists the sections in the order they should be rendered.
Changes made in the theme editor will be reflected here.
The main allure of Shopify sections is manipulating them in the theme editor.
We covered this topic extensively in our guide to Shopify theme customization, but we’ll briefly go over the broad strokes here.
Add or remove sections or blocks
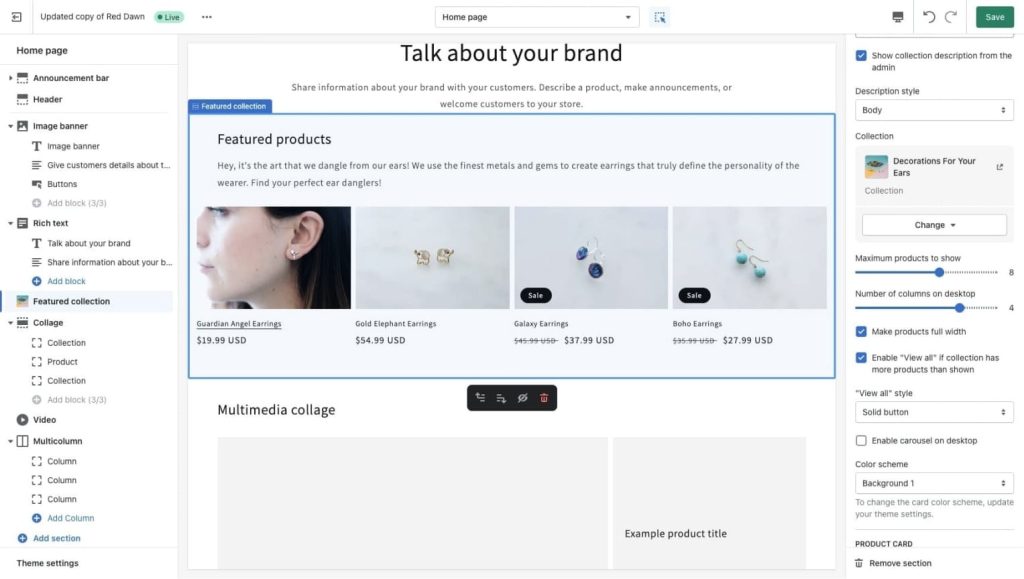
Changing your page layout starts with the elements you include on the page. In the theme editor, adding a section is as easy as clicking Add section and choosing from the list of available sections.
New sections start at the bottom of the page for you to move as needed.
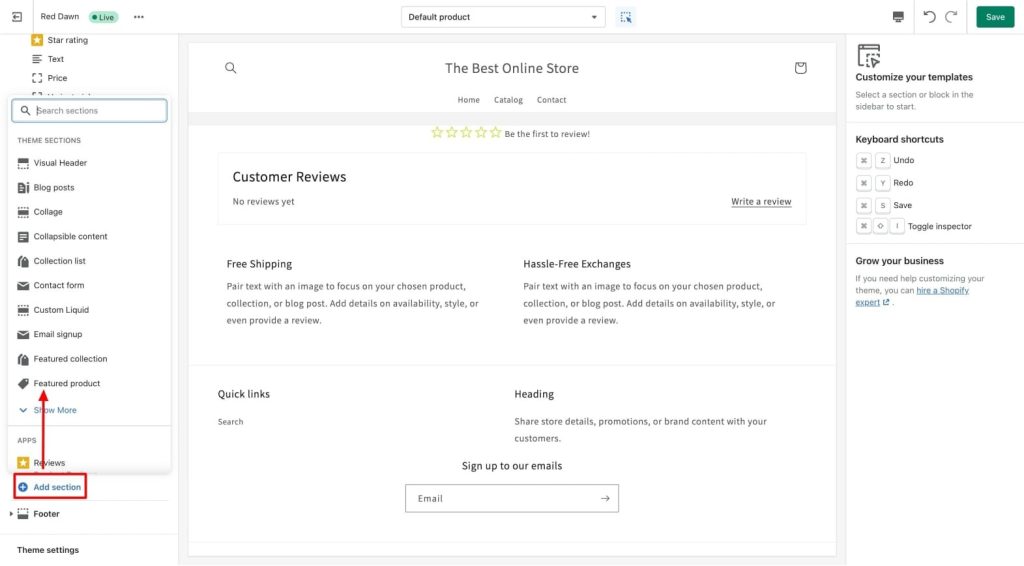
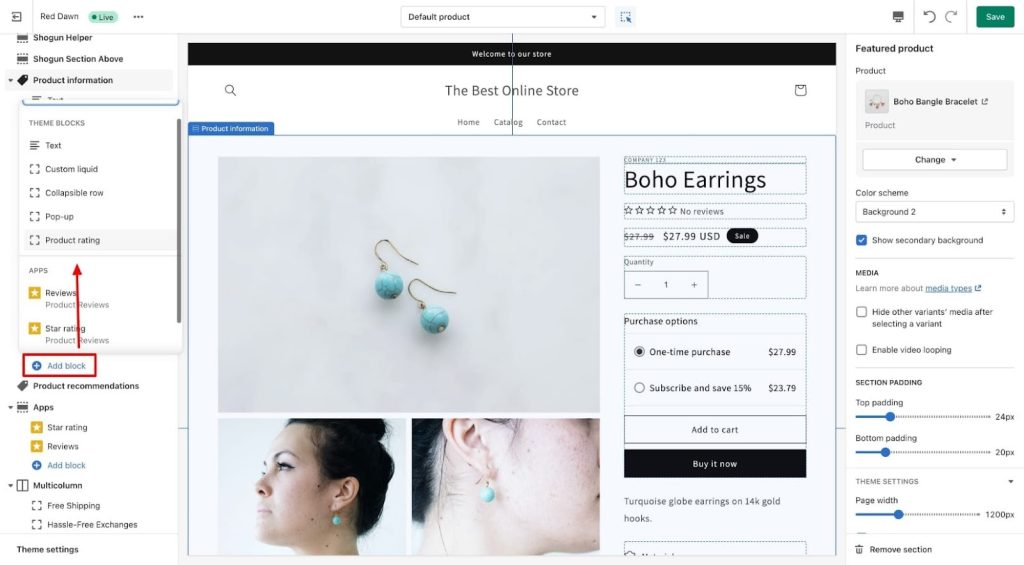
Blocks are added in just the same way as sections. Find the section to which you want to add a block and click Add block.
The available blocks will depend on the section. The Product Information section has quite a few blocks within it.
Once again, it will start at the bottom of the section, so you need to move it where you want it.
Removing sections and blocks is even easier than adding them.
Simply click on the section or block you want to remove and either click the Remove section (or Remove block) button in the bottom right corner or click the trash can icon in the preview screen (a newer update to the theme editor).
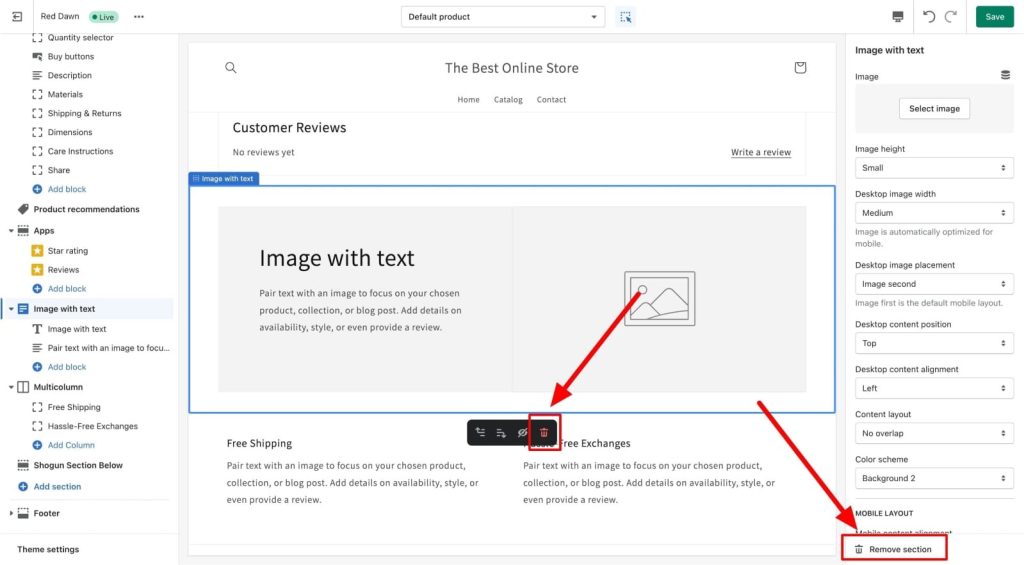
Move sections or blocks up or down the page
After adding a section or block, you’ll likely want to move it out of that bottom position.
To do this, you just hover over the section or block in question, click and hold the six-dot icon, and drag it wherever you want.
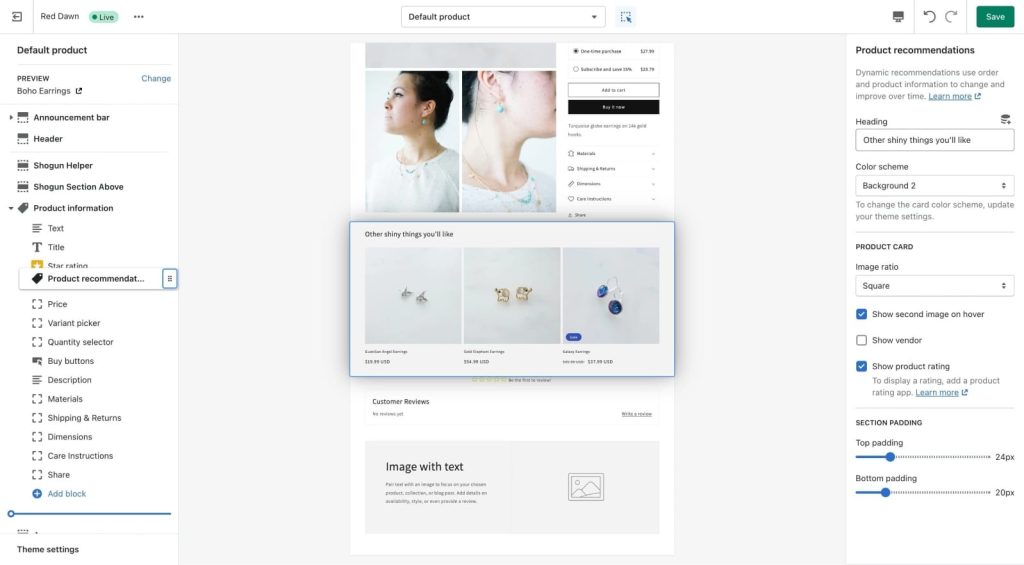
For sections, the preview pane will zoom out as you move up or down to show you where you are placing the section.
Customize sections and blocks
Finally, when everything is in its right place, you’ll want to customize the sections and blocks to best fit your vision of the page.
Click on the section or block, and the customization menu will show up along the right side of the screen.
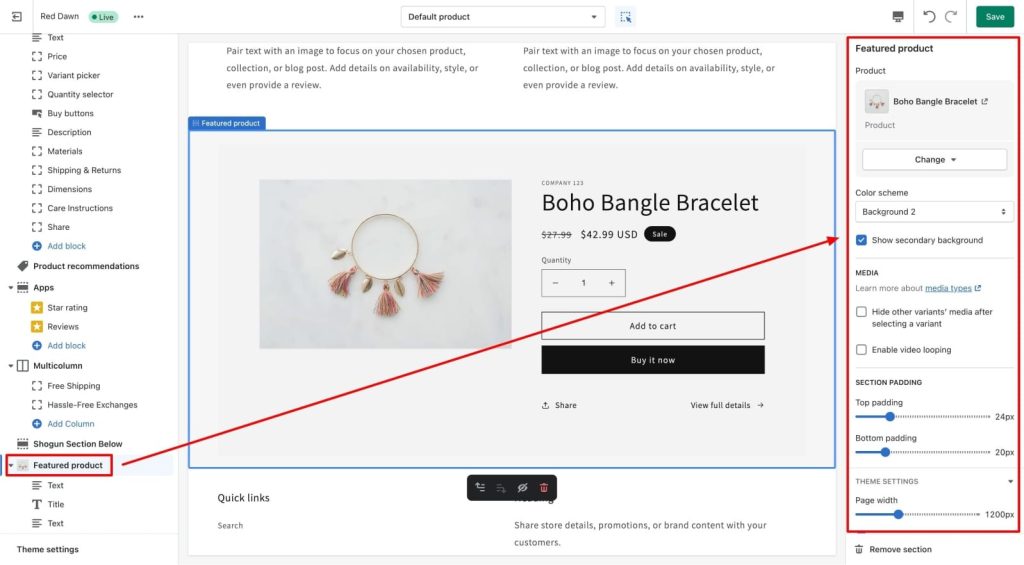
Each section and block has its own set of customization options determined by the theme.
You can change things like heading text, image displays, alignment, colors, padding, margins, etc. Some sections will have very few options, while others will have many.
If you have a custom-coded section for your Shopify theme, adding it via the code editor is relatively simple.
Note: We recommend this work be completed by experienced developers. While Liquid is a user-friendly coding language, you can easily break your theme with simple formatting errors.
Step 1: Navigate to Sections in the code editor
Scroll down to the Sections folder in the code editor for your theme.
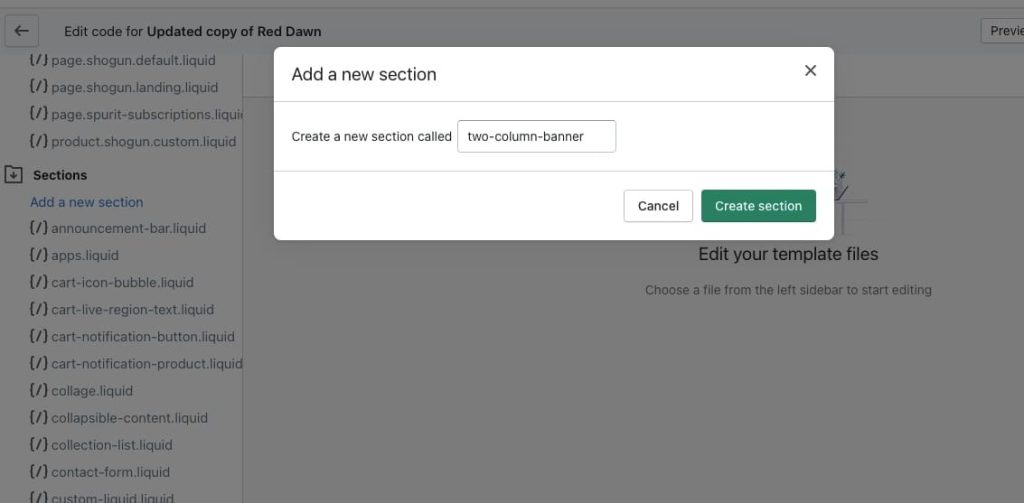
Click Add a new section.
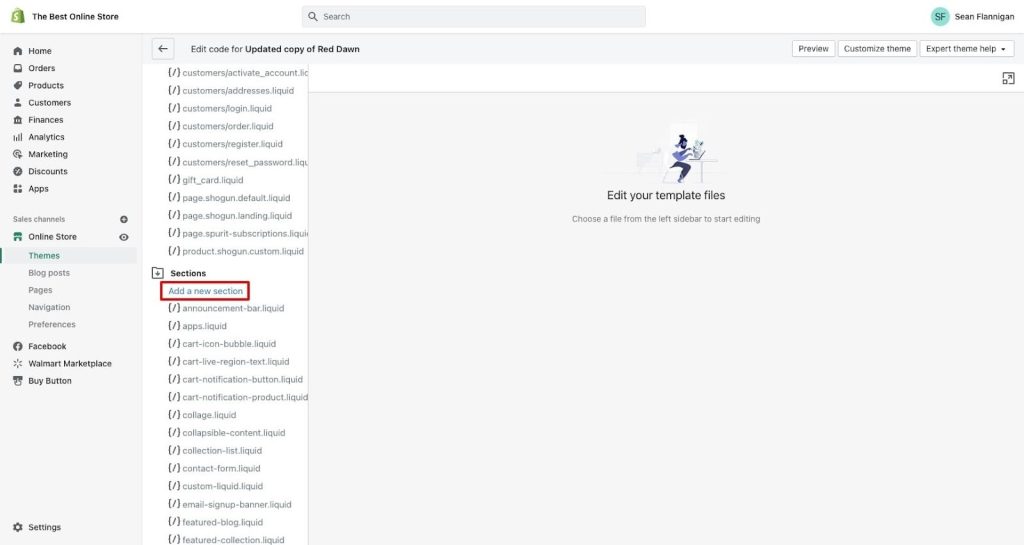
Step 2: Name your new section
Following naming conventions—such as banner sections including the word “banner”—assign a name to your new section with dashes between words.
Click Create section when ready.
Step 3: Add in your custom Liquid code
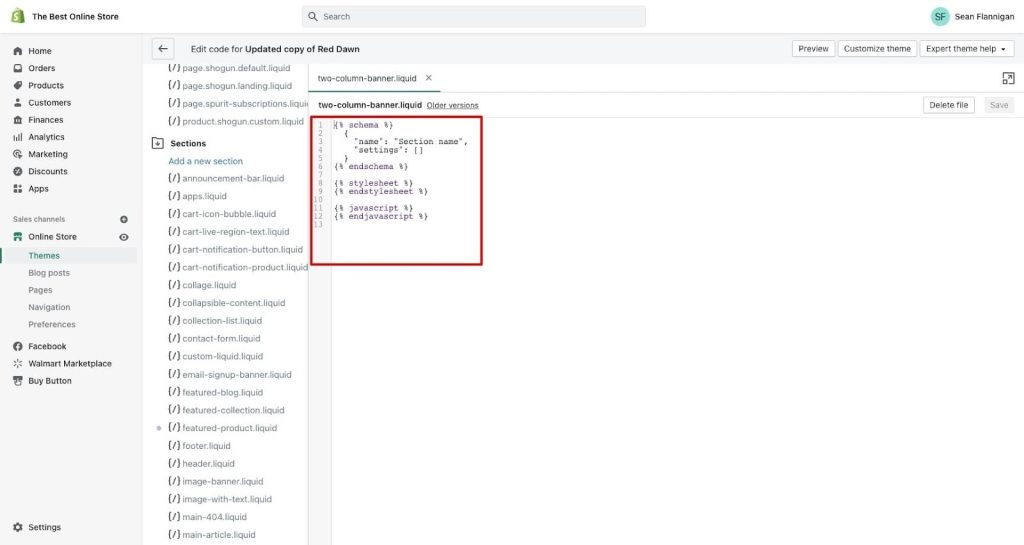
When your new section file is created, it will come ready with a simple template with spaces to add your section schema, CSS stylesheet assets, and JavaScript.
Step 4: Add your custom section to page templates
If your custom code includes the correct information in the presets, your brand new section will be available to add via the Shopify theme editor.
You can limit the pages it can be used on or make it available to any page template.
That said, creating custom-coded sections isn’t a walk in the park.
It requires a developer to take your vision and make it a reality, which often becomes a game of telephone. The result doesn’t always meet your expectations, after which more development is required.
Ideally, you could just create a custom Shopify section yourself, without dealing with code. This brings us to…